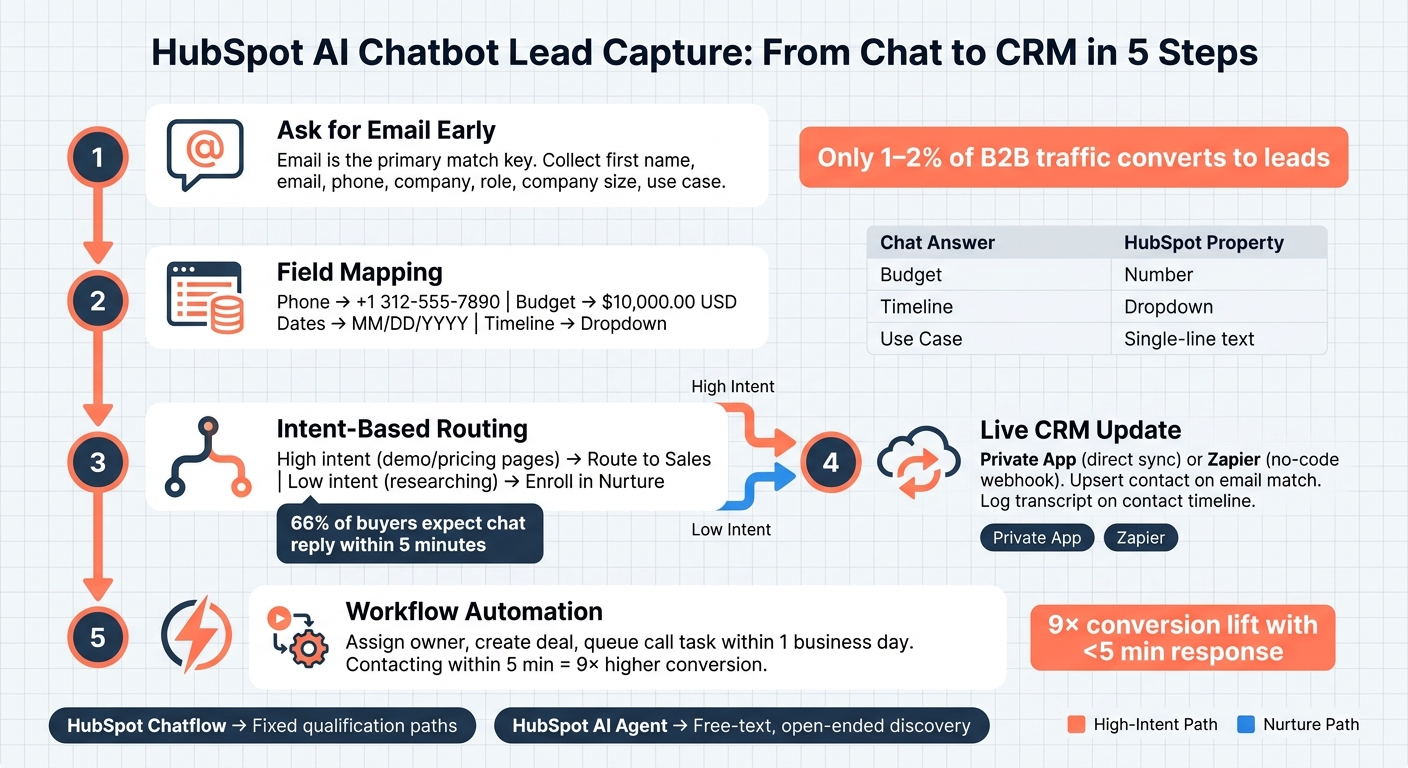
If you want chat to turn into CRM-ready leads, the setup is simple: collect an identifier early, map each answer to the right HubSpot field, and trigger follow-up the moment intent shows up. With only 1%–2% of B2B traffic turning into leads, and 66% of buyers expecting live chat replies within 5 minutes, slow forms leave money on the table.
Here’s the short version of what I’d take from this guide:
- Ask for email early so HubSpot can match or create a contact
- Map chat answers to the right properties like phone, budget, timeline, and use case
- Use Chatflows or AI agents based on how fixed or open-ended you want the chat to be
- Sync ChatSpark to HubSpot with a Private App or Zapier
- Trigger workflows right away for routing, owner assignment, tasks, and deal creation
- Test updates and duplicates before launch so one email updates one record
- Track data quality like phone format, missing fields, and lifecycle stage accuracy
In plain English: the chatbot should do more than talk. It should use intelligent lead capture, write it into HubSpot, update old records when the email already exists, and move sales-ready contacts to the next step without manual work.
A few points stand out:
- Email is the main match key in HubSpot contact sync
- Phone numbers should use +1 format, such as +1 312-555-7890
- Dates should use MM/DD/YYYY
- Budget fields should use USD, like $10,000.00
- High-intent pages like pricing, demo, and contact pages are the best places to show the bot
- Known contacts and unknown visitors should not see the same chat experience
If I were setting this up, I’d keep the flow tight: ask for first name, email, phone, company, role, company size, and use case, then branch by intent. Someone asking for pricing or a demo should go to sales fast. Someone who is still researching should go into nurture.
You also don’t need to overbuild it. A HubSpot Chatflow works well for fixed qualification paths. A HubSpot AI agent fits better when you want free-text answers and looser conversations. And if ChatSpark is part of your stack, the handoff into HubSpot should happen through either:
- a Private App for direct contact updates, or
- Zapier for a no-code webhook flow
The main goal is not the chat itself. The main goal is clean contact records, fast follow-up, and fewer missed leads. That’s the thread running through the whole article.
Below, the article walks through the setup from property mapping to routing, sync, testing, and reporting.
HubSpot AI Chatbot Lead Capture: From Chat to CRM in 5 Steps
1. How HubSpot chat and CRM contact sync work
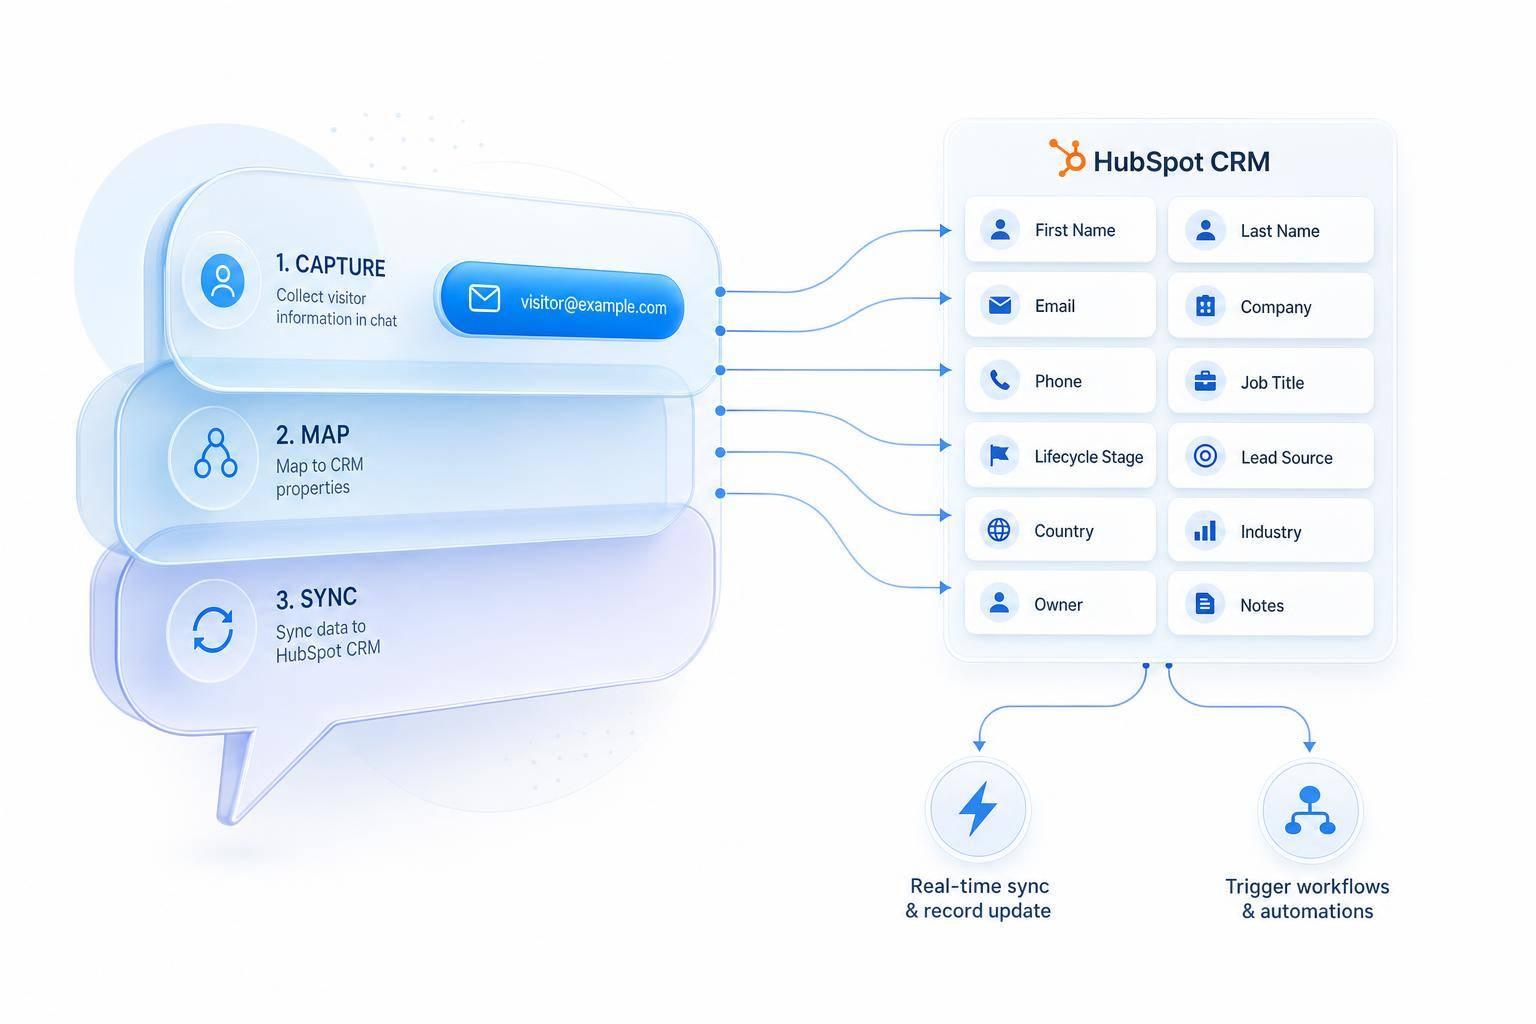
When someone starts a chat, HubSpot treats them as anonymous at first. That changes when they share an identifier, usually an email address. Once HubSpot gets that email, it checks for a matching contact record. If it finds one, it updates that contact. If it doesn't, it creates a new record. HubSpot also logs the chat transcript on the contact timeline alongside emails, meetings, and calls, which gives sales and support teams one place to see the full conversation history.[2][6]
Now that the matching process is clear, the next step is setting up the HubSpot fields your chatbot will write to.
HubSpot Chatflows, AI agents, and contact properties explained
Rule-based Chatflows follow a fixed path. They ask set questions, branch based on the visitor's answers, and send each response to a matching contact property. For example, a Chatflow can ask, "What's your monthly budget?" and save that answer to a budget property on the contact record. That gives your team close control over what gets updated and when.[9]
HubSpot AI agents handle things a bit differently. They can read free-form replies, tailor responses based on existing contact properties, and update records as new details come up during the conversation.[8][9]
The contact properties that matter most for chat-based lead capture are:
| Property | Why It Matters |
|---|---|
| Main identifier for contact matching and deduplication | |
| Phone number | Helpful as a backup identifier in connected systems |
| Company / Job title | Helps with B2B qualification and follow-up |
| Lifecycle stage | Shows where the lead is in the funnel |
| Lead status | Helps with routing and follow-up priority |
| Original source | Shows that the lead came from chat |
| Budget / Timeline / Use case | Records buying intent from chatbot questions |
When chat creates a new contact vs. updates an existing one
Email is the main match key. If the email collected during the chat matches an existing contact, HubSpot links the conversation to that record and updates its properties. If there is no match, HubSpot creates a new contact.[2][3][4][5]
For messaging channels that don't provide email, use a phone number or channel ID as the fallback identifier. It's smart to ask for that identifier early. If you wait too long, you may end up with a chat conversation but no CRM record your team can use for follow-up.[7]
Property mapping is where things often go wrong. Map email and phone number to HubSpot's standard fields. Then map budget, timeline, and use case to separate properties so your workflows and reports can use that data cleanly.[3][4][5]
Before you build the chatflow, check your CRM properties and make sure the mapping rules are set the way you want.
2. Prepare HubSpot for real-time lead collection from chat
Before you build the chatflow, get the setup right. That means permissions, connected channels, and contact properties. If one piece is missing, routing can fail or lead data can end up in the wrong place. The goal is simple: make sure each chat answer lands in the right HubSpot field the first time.
Check access, channels, and CRM properties
The person setting this up needs Super Admin access or a role with the same permissions for Conversations Inbox, Chatflows, Contact properties, and Workflows.
Next, check your channels. Go to Conversations → Chatflows and make sure your website chat is connected. Also confirm that each channel sends conversations to the right Inbox. A small mismatch here can create a mess fast.
Then review your CRM properties. In Settings → Properties, filter for Contact properties and confirm these standard lead fields are active:
- Phone number
- First name
- Last name
- Lifecycle stage
- Lead status
- Original source
After that, add any missing custom properties your chatbot will update during the conversation. A prefix like Chat – makes those fields easier to spot and filter later.
Here are the fields your chatbot should write to in real time:
| Custom Property | Type | Purpose |
|---|---|---|
| Chat Lead Source | Single-line text | Tags where the lead came from, such as Website Chat |
| Last Chat Channel | Single-line text | Records the channel used in the most recent conversation |
| Chat Qualification Score | Number | Stores an intent score based on conversation depth |
| First Contact Date (Chat) | Date picker | Logs when the contact first engaged via chat |
| Qualification Answers | Multi-line text | Captures free-form answers from key chatbot questions |
With permissions, channels, and fields in place, you’re ready to collect those answers inside the chatflow.
Set up pre-chat forms and field mapping rules
Inside the chatflow builder, HubSpot’s Email capture setting controls when a visitor is asked for their email. On pricing and demo pages, ask for it right away. On other pages, it can make sense to wait a few messages if the visitor needs a little context first.
This matters because field rules drive branching, routing, and qualification inside the chatflow builder.
For phone numbers, ask visitors to include the country code, like +1 555 123 4567. HubSpot’s Phone number property accepts that format. If you standardize numbers to E.164 format (+1XXXXXXXXXX), SMS and telephony tools are much easier to use later, without cleanup work.
For date fields, such as a preferred demo date, use HubSpot’s Date picker property type. In the prompt, spell out the format you want, such as MM/DD/YYYY. That saves back-and-forth and cuts down on bad data.
Match each question to the right property type:
- Use Number for numeric answers
- Use Dropdown for fixed choices
- Use Date picker for dates
- Use Single-line text for short written answers
A few examples make this clearer. Budget should map to a Number property and be entered in USD, such as $10,000.00. Timeline should map to a Dropdown with choices like 0–3 months, 3–6 months, or 6+ months.
That structure is what makes workflows and reports usable later. These properties will become the targets for the chatbot questions you build next.
3. Build a lead capture chatbot in HubSpot and qualify leads automatically
With your properties mapped and your channels set, you’re ready to build the bot itself. The job here is simple: collect the right details, spot high-intent visitors, send lower-intent ones into nurture, and pass each person to the right next step.
Create a lead capture chatflow with mapped questions
Go to Conversations → Chatflows → Create chatflow → Website → Bot. You can start with a template or build from scratch. Either way, stick to one goal and one clear path.
Start with a low-friction greeting. Then use Ask a question actions to collect these fields in this order:
- first name
- phone number
- company name
- role
- company size
- primary use case
That order works well because it starts with the easiest asks. People are far more likely to share basic details first. By the time you get to company size or use case, they’ve already taken a few steps and are more likely to keep going. Make sure each answer maps to the right contact property.
For fields like company size or timeline, use buttons instead of open text. It keeps answers clean and stops your CRM from filling up with messy variations.
Use branching, property updates, and routing actions
Once the answers come in, if/then branches do most of the work. Someone who chooses "Ready for a demo" and "50+ employees" should not go down the same path as a visitor who picks "Just researching" and "1–10 employees." One is ready to talk. The other may need more time.
Send the first group to a rep or straight to a meeting link. Move the second group into a nurture sequence.
You should also set background property updates at key points in the flow. If someone completes the pricing-page chatflow, automatically set their Lifecycle stage to Lead and their Chat Lead Source to Website chat. After that, connect the bot outcome to a HubSpot workflow so HubSpot can create a sales task, assign an owner, or send a follow-up email without anyone doing it by hand.
Set targeting rules for high-intent pages
Show the bot on pricing, demo, contact, and core product pages. Hide it on blog and resource pages.
Use HubSpot’s URL targeting rules to control where the bot appears. Then add visitor type targeting on top of that. Show the lead capture flow to unknown visitors. For known contacts already in your CRM, switch the message to something more support-focused.
Next, connect the flow to HubSpot so each qualified chat updates the CRM in real time.
4. Connect ChatSpark to HubSpot for live CRM updates
Once lead capture is working, the next move is to send those fields into HubSpot so each qualified chat updates the right contact right away. Connect ChatSpark to HubSpot so qualified answers flow into contact records in real time.
Private App setup for direct contact updates
Go to HubSpot and open Settings → Integrations → Private Apps. Create a new app and give it a clear name, like ChatSpark Integration, so you can spot it later without digging around.
Only grant the scopes you need:
crm.objects.contacts.readandcrm.objects.contacts.writeto find and update contactscrm.objects.companies.readandcrm.objects.companies.writeif you also sync company datacrm.objects.deals.writeif ChatSpark should create a deal when someone shows demo intentcrm.schemas.contacts.readto read property definitions during field mapping
When the app is ready, HubSpot will generate an access token that starts with pat-. Store that token in a server-side secret manager, then add it to ChatSpark’s HubSpot action. [1]
From there, map each ChatSpark field to the matching HubSpot property. For example, send email to email, phone to phone like +1 312-555-7890, first_name and last_name to firstname and lastname, and company_name to company. For intent, such as Book demo or Pricing, send it to a custom property like chat_intent.
If you’re running paid campaigns, pass utm_source, utm_medium, and utm_campaign into HubSpot tracking properties too. That way, attribution data lands in the contact record on its own.
Upsert the contact as soon as you capture the email. Then, if the visitor signals demo intent later in the chat, send a second event to set lifecycle stage to Marketing Qualified Lead and, if you want, create a deal. That keeps HubSpot current and ready for sales follow-up.
Zapier setup for no-code lead sync
If engineering help is limited, Zapier gives you a no-code route between ChatSpark and HubSpot. Set ChatSpark to send an outbound webhook when a key event happens, like email captured or demo intent detected. Include the main fields in the payload: email, phone, name, company, intent, and page URL.
In Zapier, the flow is simple: catch webhook → find contact by email → create or update contact → create task or deal.
Use the Private App route for direct sync. Use Zapier for webhook-based no-code sync.
Test contact creation, updates, and timeline activity
After field mapping is done, test the full setup and make sure chats create, update, and log contacts the way you expect. Start with the widget on a staging page using a new email and phone number. Finish the lead capture flow, then search that email in HubSpot.
Check for three things:
- The contact was created
- The mapped properties are filled in, including email, phone, intent, and UTM data
- The contact timeline shows an engagement entry from the integration
Then run the test again with the same email but a different phone number. HubSpot should update the existing contact instead of making a duplicate. That’s how you know your upsert logic is doing its job.
Last, confirm that any workflows tied to property changes show up as expected, such as a new task, deal creation, or a follow-up email. Log test times in MM/DD/YYYY format so you can match chat events with HubSpot activity later. [1]
Use those checked properties in the next step to trigger follow-up workflows.
5. Automate follow-up, measure results, and review the full setup
Trigger workflows, assignment, and sales follow-up
Once you’ve confirmed sync and timeline activity, connect those same properties to workflows. This is where the setup starts doing real work: assigning owners, alerting reps, and pushing qualified chats into sales follow-up.
A simple way to handle it is to split the job across two workflows. Use one to route the chat, and use another to update the contact record.
Use a conversation-based workflow to assign an owner and send an internal alert when a chat opens, closes, or creates a transcript. That alert should include:
- phone
- qualification score
- budget range in USD
- page URL
That way, reps can sort priorities fast instead of digging through records.
Then use a contact-based workflow to update lifecycle stage, create a deal, and queue a call task due within 1 business day - for example, 09/10/2026 3:00 PM ET.
When the chatbot confirms a requested demo or updates "Meeting booked" to Yes, move the contact from Lead to Marketing Qualified Lead and create a deal. From there, branch based on Lead status or the score captured in chat.
Some leads are interested but not ready to talk to sales yet. In those cases, enroll them in a nurture sequence tied to the industry, product line, or purchase timeframe collected in chat.
And yes, speed matters. A lot. Contacting a lead within 5 minutes can increase conversion rates by 9× compared with slower responses.[10]
Track chat lead volume, conversion rates, and data quality
After routing is in place, check whether it’s producing clean records and faster follow-up. The most useful HubSpot reports for chat-based lead capture are:
- Chat-sourced lead volume - contacts filtered by Chat Lead Source or Original source, tracked monthly
- Contact → Meeting and Contact → Deal conversion rates - broken down by first chat
- Time-to-first-response - compare the first inbound chat timestamp against the first rep reply
- Field completion rates - the share of chat contacts with email, phone, company size, and budget filled in
After launch, audit phone format, duplicates, lifecycle stage, and lead source. Make sure phone numbers follow US formatting such as +1 312-555-7890. Also check that lifecycle stage and lead source are filled in the same way across records.
If chat leads have strong email completion but weak budget data, adjust the chatbot script so it asks for budget earlier. Small tweak, big payoff.
Use HubSpot Chatflows for structured qualification and AI agents for open-ended discovery.
Conclusion: The shortest path from chat to clean HubSpot records
If the reports and audits look clean, the integration is ready to scale. Connect chat capture to CRM updates, trigger workflows from the properties your chatbot sets, and review contact timelines to make sure activity logs the right way. When this setup is done right, your team gets faster response times, less manual entry, and cleaner HubSpot records.
FAQs
How early should I ask for email in chat?
Ask for an email address as soon as you need it to keep the conversation moving. Keep the ask short and natural so more people are likely to respond.
For first-time outreach, a name and email are usually enough. Your AI agent can grab those details when the chat opens or when someone uses words like email, contact, or call, then validate the info and sync it to your CRM right away.
What happens if the contact already exists in HubSpot?
If the contact already exists in HubSpot, ChatSpark won’t create a duplicate record. Instead, it checks for the contact by email and uses HubSpot’s Update Contact action to refresh the contact properties with the latest details from the chat.
That way, the workflow keeps moving for follow-up.
Which chatbot fields matter most for lead routing?
Prioritize fields that show intent and fit. Start with the basics: name, email, and phone number. Those details make follow-up easier and help with CRM matching.
Then ask for qualifying details that line up with your Ideal Customer Profile, like company size, industry, budget, and implementation timeline. Keep the form tight and focused on what matters most. That way, you can route leads more accurately without dragging down conversion rates.