My rule for an AI booking chatbot: don’t confirm an appointment until your scheduling system accepts it. With ChatSpark, I’d start by connecting Google Calendar or Square, setting service and staff rules, and testing bookings, reschedules, and cancellations.
Here’s what I’d check before launch:
- Booking setup: Service durations, prices, business hours, buffers, policies, customer fields, and time zones.
- Customer conversations: Live availability, approval of appointment details, and identity checks before appointment changes.
- Notifications and staff help: Confirmations, reminders, privacy notices, and a handoff after 2–3 unsuccessful exchanges.
- Testing and results: Calendar errors, double-booking attempts, and notification delivery - then booking conversion, failures, handoffs, no-shows, and staff time.
The goal is less scheduling work, not just more automated replies. I’d keep the scheduler in control and retest whenever services, prices, or policies change.
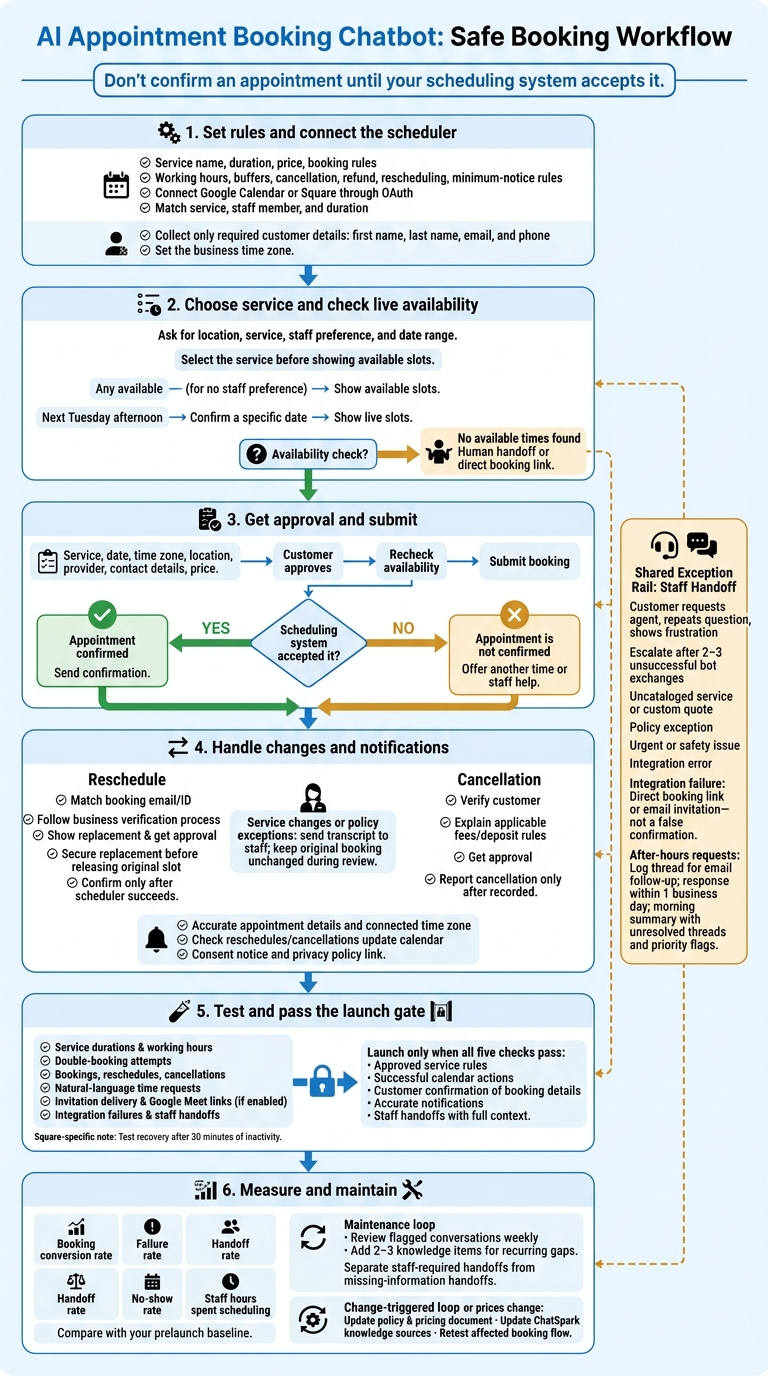
AI Appointment Booking Chatbot: Safe Booking Workflow
1. Set Booking Rules and Connect Your Scheduling System
Define Services, Durations, and Policies
List each service’s name, duration, price, and booking rules. Then set service durations, working hours, and buffer time in your scheduler.
For Square Appointments, enable “Online booking” for each service. For Google Calendar, define Meeting Types in ChatSpark and set buffer time there. Set working hours explicitly - otherwise, the scheduler may default to 9:00 AM–5:00 PM on weekdays. [1][2]
Add cancellation, refund, rescheduling, and minimum-notice rules to ChatSpark’s knowledge base. Keep those rules the same in your scheduling system. [3][4]
With the rules in place, connect the calendar ChatSpark will use to check live availability.
Connect ChatSpark to Your Booking Calendar
For Google Calendar or Square, authorize access through OAuth. Check that the connection can read open slots and create, change, or cancel bookings. Match each request to the correct service, staff member, and duration. [1][2]
Use supported actions to check availability, book appointments, cancel bookings, and reschedule. Recheck availability before submitting a booking, then verify that the scheduling system accepted it before telling the customer it’s confirmed. [1][2]
Set Required Customer Fields and Time Zone
Once booking rules and calendar access are ready, collect only the customer details you need to complete the appointment: first name, last name, email, and phone.
Set the business time zone so ChatSpark displays the correct slots across daylight saving time changes. [1][2][3]
2. Build Booking and Appointment Change Conversations
Once service rules and calendar access are in place, build prompts using AI actions that check live availability in real time.
Choose the Service and Offer Available Times
Ask only for the location, service, staff preference, and date range. Select the service before showing available slots so each option fits its duration. Offer “Any available” if the customer has no staff preference. You can also integrate Calendly to manage these event types and staff assignments automatically. Turn phrases like “next Tuesday afternoon” into a specific date, and confirm it before showing live slots. [1][2]
Example: “Would you like a 30-minute haircut or a 120-minute color treatment?” [1]
If no times fit, tell the customer no available times were found. Then offer a human handoff or a direct booking link. [1][2]
Confirm Details Before Booking
After the customer chooses a slot, show the service, date, time zone, location, provider, contact details, and price for approval. Recheck availability and submit the booking. Send confirmation only after the scheduler succeeds. If booking fails, make clear that the appointment is not confirmed, then offer another time or staff help. [1][2][4][6]
Follow the same approval steps for reschedules and cancellations.
Verify and Complete Appointment Changes
Use the booking email or appointment ID to match the request to an existing appointment. Follow the business’s verification process before sharing appointment details or making changes. For a reschedule, show the proposed replacement and get approval. Use a supported workflow that secures the replacement before releasing the original slot. Confirm the change only after the scheduler succeeds. [2][3][7]
Before canceling, explain any applicable fees or deposit rules and get approval. Report the cancellation only after it is recorded. Send service changes or policy exceptions to staff, along with the conversation transcript. [2][3][4][7]
Example: After verification, hand off a request to replace an oil change with a 3-hour engine diagnostic so staff can check technician and equipment availability. [3][4]
Keep the original booking unchanged while staff reviews the request. [3][4]
3. Set Up Notifications, Staff Handoffs, and Tests
Once booking, rescheduling, and cancellation flows work, set up confirmations, staff handoffs, and tests before launch.
Send Confirmations and Reminders
Send a confirmation after each successful booking. Google Calendar automatically sends invitations for confirmed appointments. Turning on Google Meet in the meeting type also adds a video link. [1][2]
Add a short consent notice and a privacy policy link below the widget or in the pre-chat form. Set up after-hours email alerts so unresolved chats appear in a morning summary. [3][4]
Include the appointment details and use the connected time zone. Check that reschedules and cancellations update the calendar, too. [1][2]
Hand Off Requests That Need Staff
Route these requests to staff:
| Request type | Required information | System action | Escalation trigger |
|---|---|---|---|
| Uncataloged service or custom quote | Service name, intent, contact details | Log the request and notify staff | No supported answer or low confidence |
| Policy exception | Customer ID, request details | Flag for review | Request falls outside published rules |
| Urgent or safety issue | Contact information, issue type | Notify designated staff | Safety or emergency language |
| Integration error | User email, error details | Provide a manual booking link and alert staff | API failure, timeout, or calendar connection issue |
Hand off the chat when a customer asks for an agent, repeats the same question, or shows frustration. Escalate after 2–3 unsuccessful bot exchanges. Outside business hours, log the thread for email follow-up and promise a response within 1 business day. Configure a morning summary with unresolved threads and priority flags. [3][4]
Test Booking Flows and Error Recovery
Use ChatSpark’s dashboard preview to simulate a booking, then check the test appointment in Square Dashboard or Google Calendar. Test service durations, working hours, double-booking attempts, reschedules, cancellations, and natural-language time requests such as:
“next Tuesday afternoon.”
Use your own email to check that invitations and Google Meet links arrive, including in spam folders. Simulate integration failures and staff handoffs. A failed calendar connection must lead to a direct booking link or email invitation - not a false confirmation. For Square, test recovery after 30 minutes of inactivity. [1][2][4]
Conclusion: Launch Checklist and Results to Track
After testing the booking flow, launch only when all five checks pass: approved service rules, successful calendar actions, customer confirmation of booking details, accurate notifications, and staff handoffs with full context. [1][2][4][5]
Compare results against your prelaunch baseline. Track booking conversion rate, failure rate, handoff rate, no-show rate, and staff hours spent scheduling to see whether the bot reduces manual scheduling work. [1][4]
Review flagged conversations weekly and add 2–3 knowledge items to address recurring gaps. Separate handoffs that need staff input from those caused by missing information. [4]
Whenever policies, services, or prices change, update your policy and pricing document. Then update ChatSpark’s knowledge sources and retest the affected booking flow before customers use it. These checks help keep bookings accurate and reduce manual scheduling work. [1][2][3]
FAQs
Can ChatSpark handle bookings across multiple locations?
Yes, ChatSpark can handle bookings across multiple locations. Through the Square Appointments integration, you can set up multiple locations in your settings.
The AI can then let customers choose their preferred location or identify the right one automatically based on the conversation.
How do I prevent duplicate bookings after a timeout?
Connect your chatbot to your scheduling tool and calendar so it can check availability in real time. As soon as someone books a slot, it’s marked unavailable to prevent overlapping appointments.
Use identifiers, such as session IDs, to distinguish each session and link follow-up events to the correct workflow. This keeps data consistent when a customer’s session times out or they start multiple sessions.
How can I measure my booking chatbot’s ROI?
Compare booking volumes for visitors who use the chatbot with those who don’t to measure gains in lead conversion. Track how many hours you save each week when visitors use self-service conversations instead of scheduling by email or phone. Monitor discovery call conversions, too, with a target increase of 15%–30%.
Review the time savings and conversion gains over 30–60 days to assess the chatbot’s business impact and justify your investment.